COMPLETE GUIDE TO NORTHERN LIGHTS: WHERE, WHEN, HOW
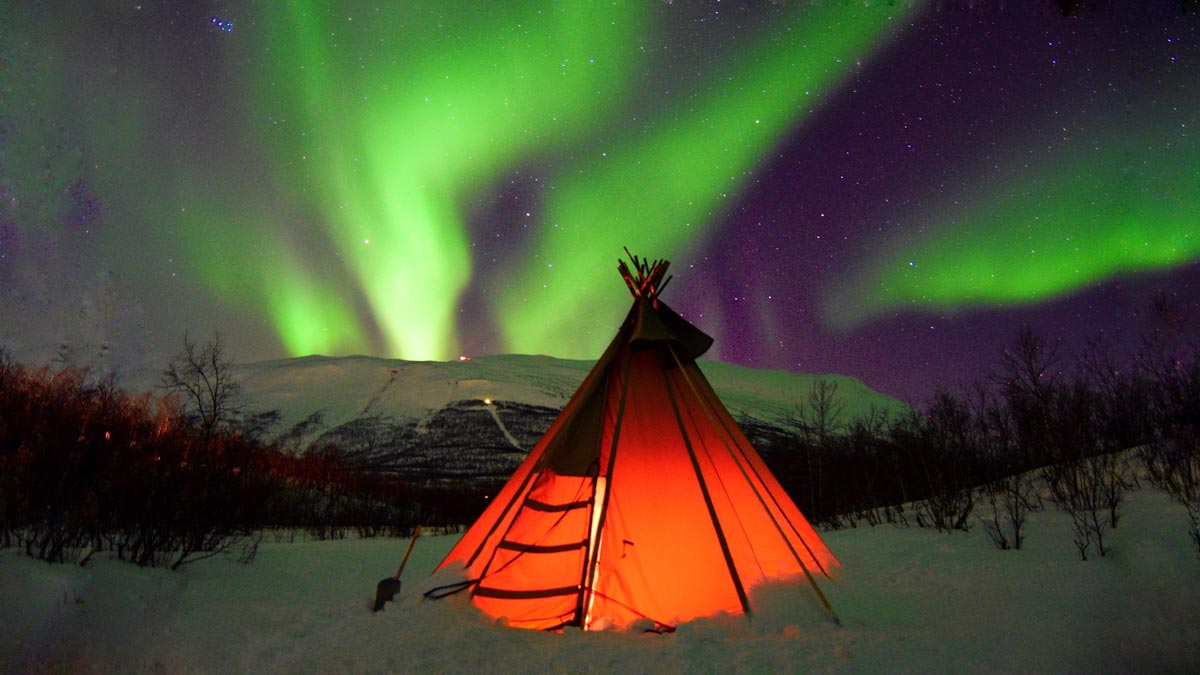
Northern lights, also known as Aurora Borealis, is arguably the most impressive natural phenomenon. Tons of people travel north to witness the dancing lights but many returns empty-handed. It is a big investment of time and money, so you want to make the wisest choice of time and location to increase our chances. So in this guide we will talk about how, when, where you should travel to maximize your chances of seeing them and some useful aurora hunting tools & strategies.
The aurorae (plural of aurora) also happen in the southern hemisphere and they are called southern lights or aurora australis. They appear in Tanzania and New Zealand. However, as the northern lights are easier to access and you have more options. So, in this article we are mostly focusing on the northern lights.
The Best Place To See The Northern Lights
| Sweden | Abisko, Björkliden, Jukkasjärvi, Kiruna, Lulea, Tornedalen |
| Finland | Inari, Ivalo, Kakslauttanen, Luosto, Nellim, Nuorgam, Rovaniemi, Saariselka, Utsjoki |
| Norway | Alta, Andoya, Bodo, Finnmark, Hammerfest, Harstad, Karasjok, Kirkenes, Kjollefjord, Lakselv, Lofoten Islands, Narvik, Nordkapp, Skibotn, Svalbard, Tana Bru, Tromso, Vardo |
| Iceland | Akureyri, Grimsey, Hvalfjordur, Isafjordur, Singvellir National Park, Reykjavik, Snæfellsnes, Vatnajokull |
| Greenland | Ammassalik, Isortoq, Kangerlussuaq, Kulusuk, Kuummiut, Sermiligaaq, Tasiilaq, Tiniteqilaaq |
| Russia | Murmansk, Salekhard, Severodvinsk |
| Alaska | Anchorage, Barrow, Bettles, Denali, Fairbanks, Fort Yukon, Prudhoe Bay |
| Canada | Calgary, Dawson City, Fort McMurray, Fort Nelson, Gillam, Lake Athapapuskow Manitoba, Pangnirtung, Whitehorse, Yellowknife, Yukon |
There are the most common places to aurora hunting locations. But this should only be a starting point of your research. Each location has its pros and cons. For example, Russia is cheaper than all but there are fewer things to go and it is far less leisurely. Some locations provide better views, some locations among them are said to have higher probability of seeing them. We suggest you check out our Aurora Location article for more insights on all aurora locations.
The Aurora Belt
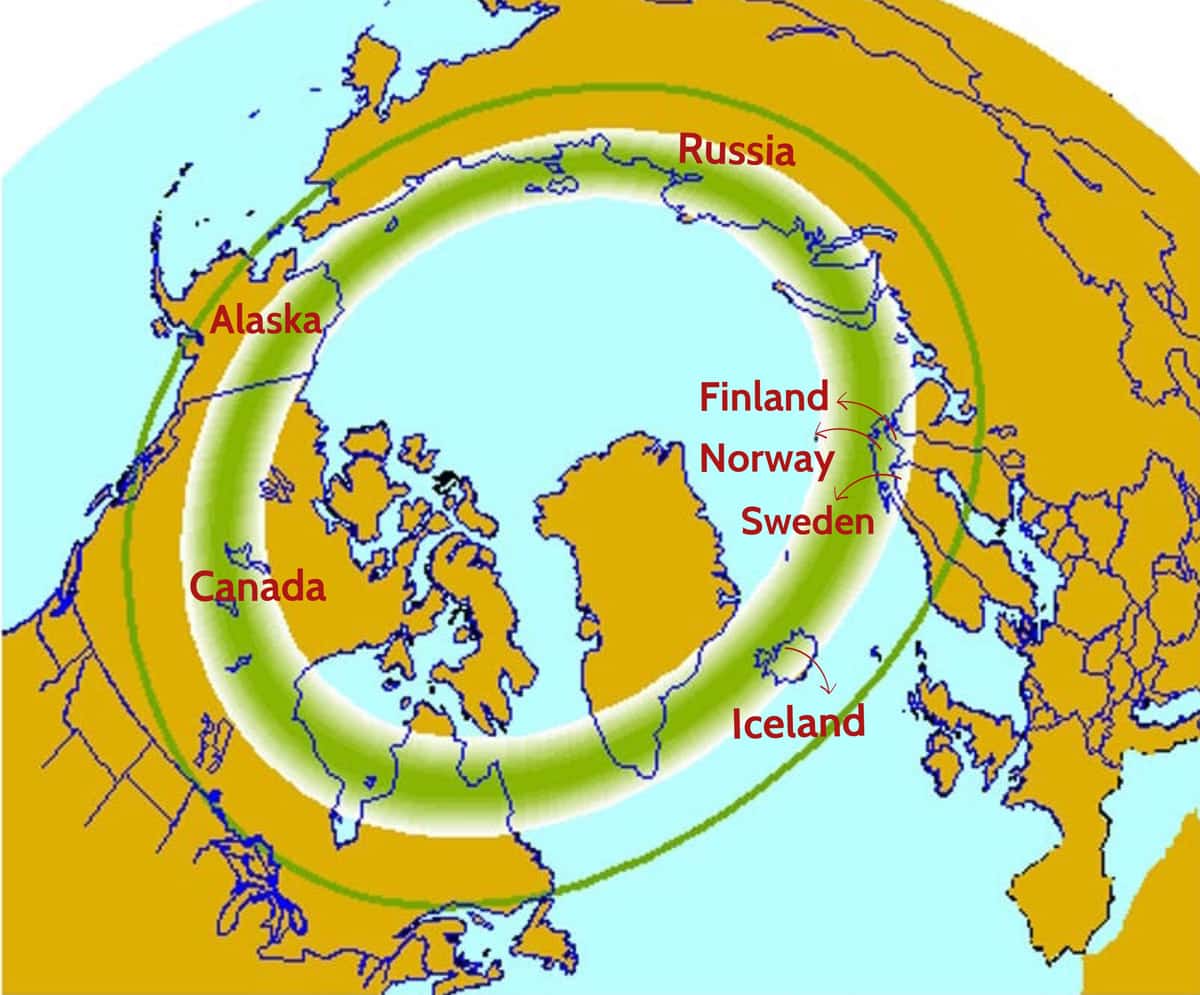
The thick green area is where the northern lights are seen even when the aurora activity is not very strong. The outer thinner green circle is how south they can be spotted on days when there is extreme activity. But that happens rarely so they are not higher probability locations. One interesting note; on rare occasions, like once in a decade, the Aurorae can be spotted as south as the Mediterranean!
As you can tell from the map, there is no aurora in the North Pole. So the myth about the lights getting better the more north you go isn’t exactly true. However, the further north you are inside the aurora belt, the higher your chances are. It has been measured that the aurora belt itself has been shifting southward over the years.
But simply going to a place which is on the aurora belt is not enough to see the northern lights. To be able to pick the best aurora spot, first, we need to understand the factors that determine the occurrence and visibility of the northern lights.
Tips For Increasing Your Chances of Seeing the Northern Lights
1. Solar Activity
Put simply, the Northern Lights happen because electrically charged particles dispersed by explosions in the sun excite the gases in our atmosphere. Earth’s magnetic poles pull these particles toward itself – both north and south -, creating the aurora belt.
So, the intensity of the solar activity – how dense and fast the solar wind is – determines how spectacular the lights will be. There are days when solar activity is very low, there are days it is very high. There are applications for tracking solar activity which will be your best friend in this venture. I will get to what those are and how to use them in a bit.
The solar wind reaches our planet in around 4 days. So when you book a trip to see the northern lights months in advance, you really are rolling the dice. I suppose it is part of its thrill.
2. Clear Skies
The second important is to thing is to have clear skies. When it is cloudy or snowy, it casts a curtain between the sky and earth obstructing the view. For example İn Lofoten Islands in Norway, the steep mountains hold the clouds that are drawn in over the ocean, therefore, getting in the way of seeing the lights. So if your priority is seeing the northern lights, there are safer bets.
In summary; you need a combination of high solar activity and clear skies.
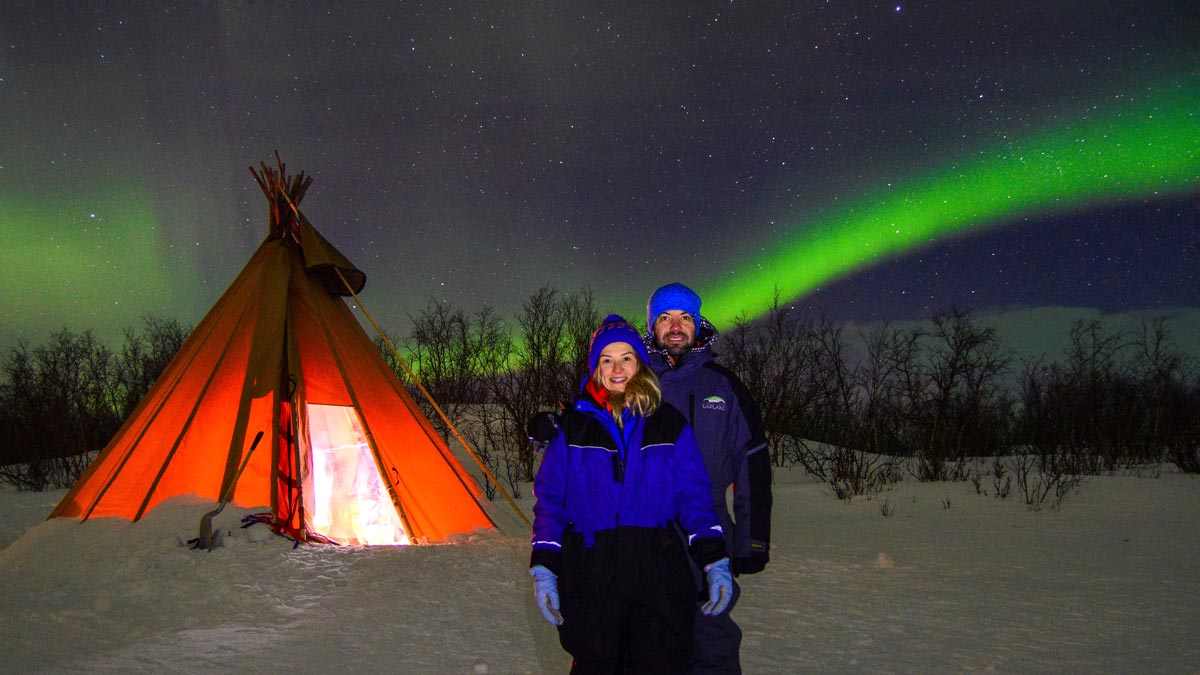
Statistically, that combination seems to appear most often in Abisko, Sweden. It is a safer bet than most locations which is why we went there. We stayed 3 nights and 1 night we were blessed with an incredible show of the northern lights. It was out of this world. But remember; no matter how much you increase your chances, it is always a bet, never a sure deal. It is also possible to find yourself setting in cloud covered Abisko, while the lights are going crazy on the same day in Norway. Being lucky is a prerequisite for seeing the Northern Lights.
Best Weather Forecast for Nordic Countries:
For all the Nordic countries, this Norwegian website is pretty accurate at weather forecasts. It is not a bad idea to rent a car and chase around good weather on days of high solar activity.
Also keep your eyes open if you are flying after dark. Once you get over the clouds, the sky clears and you might be able to catch some great aurora views.
3. Light Pollution
The darker it is, the better your eyes can see the aurora. So you need to go as far as you can from the city lights. That is why most aurora hotels are in the forest, away from the cities.
4. Avoid a Full Moon
It is better to choose dates when the sky is as dark as possible. Here is a calendar for you to see the moon’s phases. The moon doesn’t completely distract seeing the lights, but the darker the better.
5. Face North & Keep Your Horizon Clear
When the solar activity is high, the Northern lights are all over thy sky. They dance and shine. However, when the activity is low, it looks like city lights reflecting on the sky and it is cluttered on the horizon in the north and it doesn’t move much. So if you have some trees or hill in front of you, it will obstruct your view. It is best to go someplace high or near a lake. They will both provide you a clear horizon.
6. Give Yourself Enough Time
You can increase your chances by traveling a longer period in the aurora zone. You will have more shots in a week than a weekend. So, you also need to consider a region where you can keep yourself entertained for a long period. We did a 10-day road trip to the Swedish and Finnish Arctic region. It was packed with really fun activities and we were blessed with some strong Northern Lights for 4 days. You can check out our recommended itinerary here.
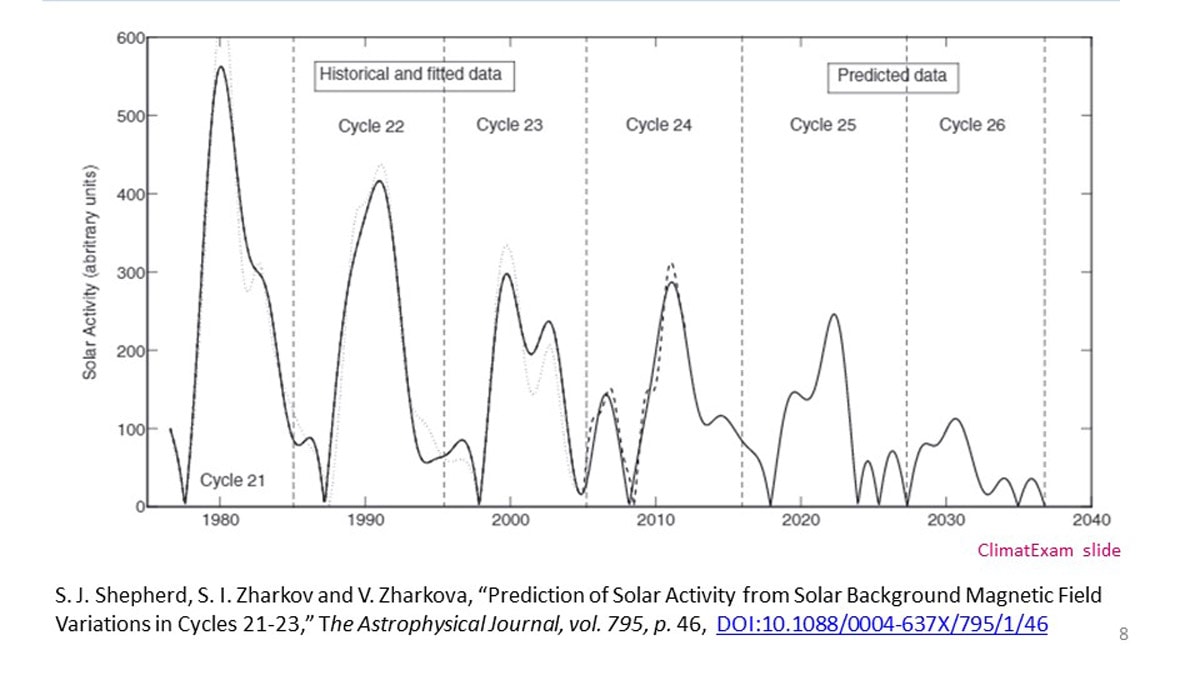
7. Sunspot Cycle
Solar activity has a rhythm. It goes through roughly 11-year long cycles. All cycle long, there is solar activity and thus northern lights but scientist found that the biggest geomagnetic storms happen at the peak of the 11-year sunspot cycle or three years after the peak. So if you can arrange to go during those years, there is a chance you will get extraordinary sightings.
So should you wait for the peak or 3 years after? Not necessarily. We went at the bottom of a cycle (March 2019) and your guide informed us that it has been a spectacular year of northern lights. We even had the chance to catch a few coronals.
Best Time to See the Northern Lights
When to Go
The northern lights are visible between Sept and March.
Best Time: In a lot of sources you might read that, the best months for watching the northern lights are Sept and March especially around the two equinoxes. There is no scientific evidence we could find regarding those dates but there are articles even on NASA’s website why the tilt of the Earth during the equinox drives the strongest solar winds towards the planet’s poles during equinoxes.
Sept – Oct: If you choose to go in September or in October, you will get warmer weather. The water bodies will not freeze yet, so you can take nice reflection photos of the northern lights. The downside is that there won’t be much snow for winter activities such as ice-fishing, ice-karting, etc…
Nov – Jan: The length of day-time gets extremely short in the Arctic regions during the winter. The further north you head, the less day time you will get. For example if you are in Abisko, you might be getting 4-5 hours of daylight a day. It can be quite a unique experience. Longer dark hours does mean more chances to spot the aurora but also restricts the activities you can do outside. Also, the temperatures are at their lowest, so there is a lot of snowfall which can block the view.
Feb – March: We like March the best because it gets warmer, the skies clearer and there is plenty of daylight for day activities and winter activities available.
April – Aug: In the summer the solar activity is there but the sky doesn’t get dark enough. That brings us to our next point.
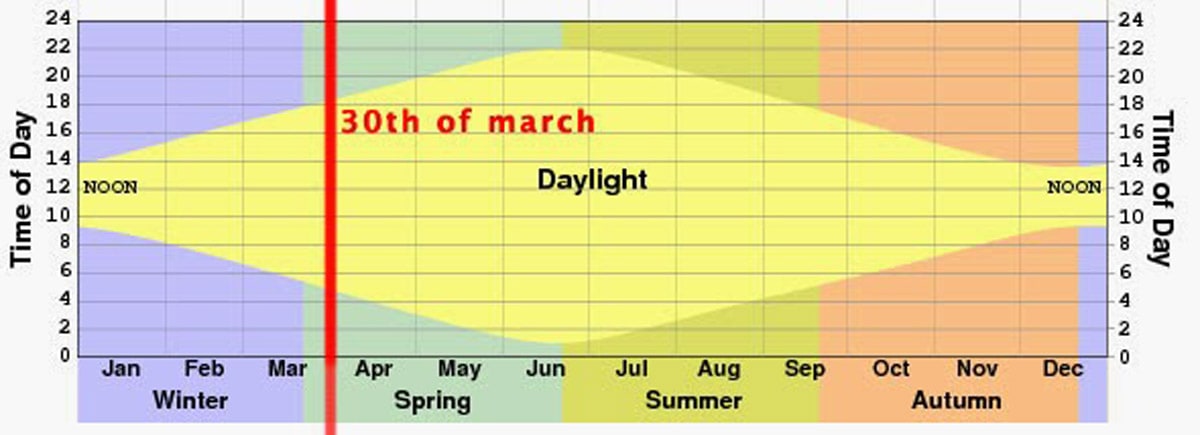
Lenght of Day Time
Cool Science Dad made this chart for Iceland, but it is more or less the same for all aurora locations.
What Time of The Day
Generally speaking, the lights are best visible from 8 pm to 1 am but it depends. Sometimes they do become visible as soon as it gets dark or they can keep you waiting much later into the night. During our trip, once they came out at 12 am and kept going till 5 am. So you need to keep your eyes on the sky at all times but also make sure to check the app.
How Much You Can See with Naked Eye vs. Photos
It all depends on the level of activity. For the comparison below, we assume you know how to take long exposure shots.
Very Low Aurora Activity

On the day we took this photo, we couldn’t see any activity with our eyes. Our eyes are not sensitive enough to pick up very low lights but the cameras can.
You can try to take a few photos but you need to have a good camera and good post editing skills. Editing low light puts a lot of stress on the image’s quality. A few different people tried to save this photo and this is the best it gets.
Low Aurora Activity
Yes, you can see with your own eyes! It looks like a green haze, or a green cloud, similar to the edited version on the above photo but in real life. The cameras still see better than the human eye.
Medium Aurora Activity
It creates beautiful clear lines in the sky. You might even get a short glimpse of dancing lights. You can see with your eyes but the cameras still out-perform the human eye. Medium level of activity is very suitable for taking photos. You see mostly green, and maybe some whites too. If you see this, you will already be pretty impressed.
High Aurora Activity
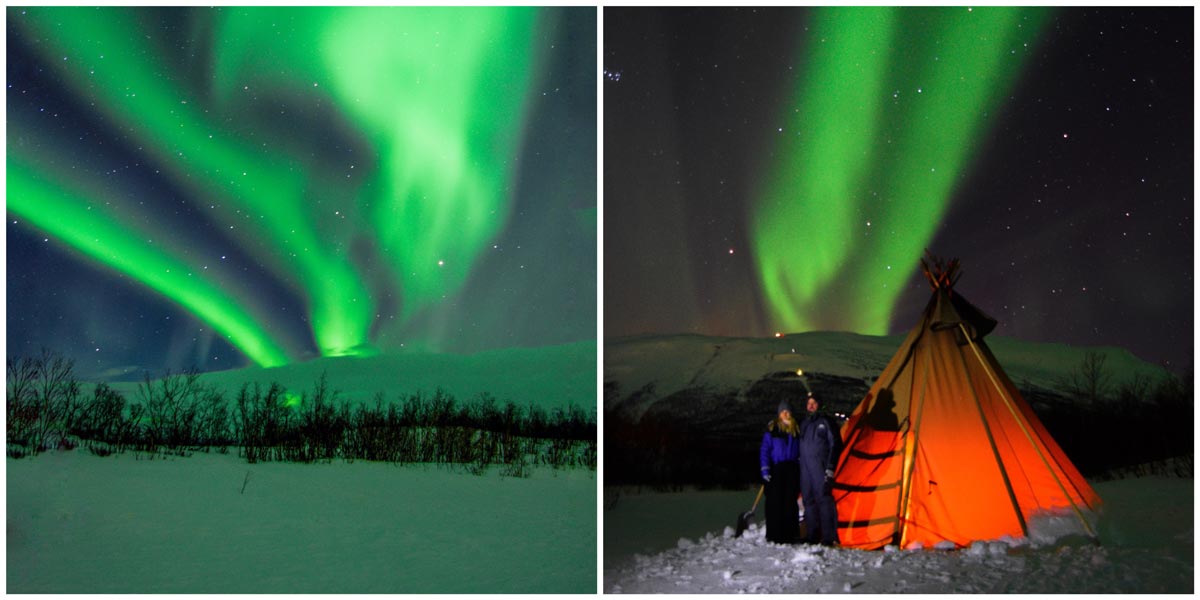
This when things get absolutely spectacular. The sky looks like a Winamp visualization with the dancing lights for those who are old enough to recall. The lights become very bright & intense, they move upward into the sky from the horizon. You start seeing multiple colors (mostly green, white and pink) and the lights dance and dance… Dancing lights and coronas are the jackpots of the northern lights.
In the video above you will see several coronas filmed on the same day in Abisko. A corona happens when there is an unusually big amount of discharge from the sun. You know it is coming when the lights move right above your head, splitting the sky in 2 with a tunnel of light. Then things get crazy. Fluid dances like ink dropped in water, bursting bright & multiple colors, the whole package.
High activity is fantastic to watch but they don’t photograph well because there is too much light and movement for long exposure shots. It just washes the sky with light, shapes, and colors get lost. But don’t worry, it is so mesmerizing that you will not even think of taking photos. If you have a camera which can handle high ISO levels and a lens with large aperture below 2, you can even shoot videos of the lights as above.
Aurora Colors
The most common aurora color is green but sometimes you can also see red to pink, blue and purple as well. I will quote directly from NASA:
The color of the aurora depends on which gas is being excited by the electrons and on how much energy is being exchanged. Oxygen emits either a greenish-yellow light (the most familiar color of the aurora) or a red light; nitrogen generally gives off a blue light. The oxygen and nitrogen molecules also emit ultraviolet light, which can only be detected by special cameras on satellites.
How to Take Aurora Photos
You can’t just point and shoot the northern lights. You need to get your camera on a tripod and get the right settings. It is nothing difficult but it requires knowing your camera well and some knowledge of photography techniques. You can earn them here: How to Shoot the Northern Lights
Even after you apply what you learn here, it still takes some practice to get it right. That sort of sucks because you need the lights to be able to practice but it can also be your one and only chance to see them. If you are new to photography or you don’t want to risk having a great photo with the northern lights, you can join an aurora photography tour. The only one we know of is Lights Over Lapland in Abisko, Sweden.
Tracking The Northen Lights with The Aurora App
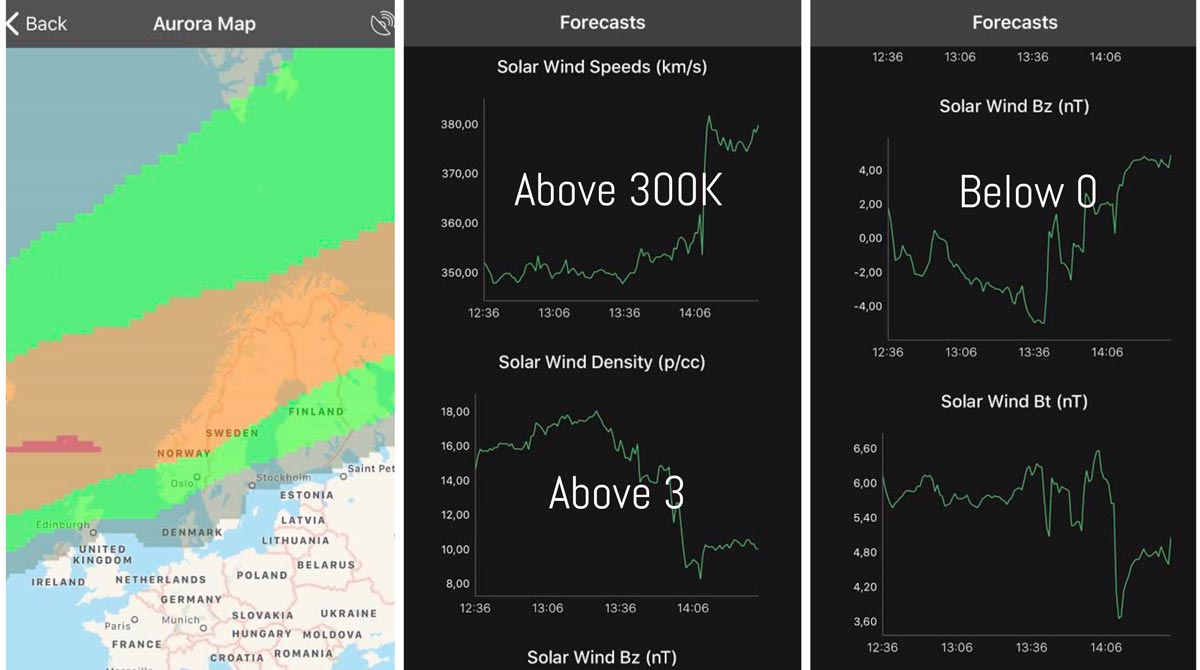
There are a few applications for tracking aurora activity. They help you estimate if you will be able to the northern lights and how spectacular they will be. We used the application called Aurora, and it was pretty accurate for us but you can’t just rely on it. Keep your eyes on the sky.
The image on the left is the summary of that night’s expectation on the map. It also integrates your location to the map, so you know exactly where you are. Green means there is going to be activity, orange means even more activity and red means northern lights paradise.
Know that you know the factors that determine the intensity of activity, we recommend analyzing the data yourself. The app provides you with information like the density and speed of the solar wind. As a rule of thumb, we when you see a density above 3, wind above 300Km/s and Bz below 0, you can expect activity in 2 hours or so. (They alter the numbers of the y axes according to activity level, that is why you don’t see the mentioned values on the middle column)
We also used paid apps that sends you push notifications when there is activity but they are not so useful.
Once again, remember that on top of this, you also need to check the weather forecast to learn about visibility. For Scandinavia and Lapland, we recommend the Norwegian forecast.
Best Glass Igloos in the Higher Probability Locations
Aurora bubbles and glass igloos are the best for watching the lights. It is warm, comfy, romantic and unique. But they are also among the more expansive accommodation alternatives. So you want to make sure that you are renting it in a high probability area. Here are the best locations we found:
What to Wear
It is cold in the north, especially at night. The fact that you are standing still while watching the lights makes it worse. It is a constant battle between an urge to rescue yourself from the cold and a desire to watch the lights. Sometimes you spend 4-5 hours outside at -20° Celsius (-4° Fahrenheit) or below because it just keeps getting better or some aurora excursions take a long time. Here are our tips:
Your hands, face, and feet get affected the most.
– Standard ski/snowboard appeal: Thermal underwear leggings and top (wool or synthetic), fleece, snow pants & jacket, ski socks.
– Heated insoles: They are electrical warmers that keep you warm for several hours. You can also use them during the day. They are rechargeable so you can use them over and over again.
– Touchscreen gloves: No doubt you will be taking a lot of photos. When you remove your gloves to handle your camera or phone, you lose a lot of heat. Touching a metal like the body of an SLR or a tripod is the worst. Save yourself some pain by buying touch screen gloves. It is worth spending some money on a high-quality one because some gloves use their sensitivity completely over a few washes!
– Mittens: Touchscreen gloves will protect you but they are not enough to combat the cold alone. Get mittens to go over the touchscreen gloves. Your hands are much warmer when your 4 fingers are together. So mittens, not gloves.
– Neoprene face masks: Not a lot of people wear face masks but when you need it, you need it. Plus it is doesn’t cost much. Better safe than sorry.
– Polar expedition suits: It goes over your ski clothes and practically becomes your armor. If you join an aurora activity tour like snowmobiling or adventure photography, they provide you with these suits. It makes all the difference in the world.
– Sorel boots or Moon Boots: Not all winter boots are created equal. Sorel boots with rubber toes are the best. Although not as good, my Moon Boots performed alright, too.
– Others:
Extra batteries and power banks.
To see the northern lights you will go somewhere dark so a headlight comes in handy.
Conclusion
Going to Abisko in Sweden around the equinox in March is a good bet. But ultimately, it is a matter of luck, no guarantees that it will show itself.
When you are there make sure to track aurora activity from the app and the weather forecast from ny.no.
Good luck!
Follow Us on Instagram
http://www.instagram.com/p/BvGcSBoHeJC/